Tuesday, February 14, 2012

Sad Emotion

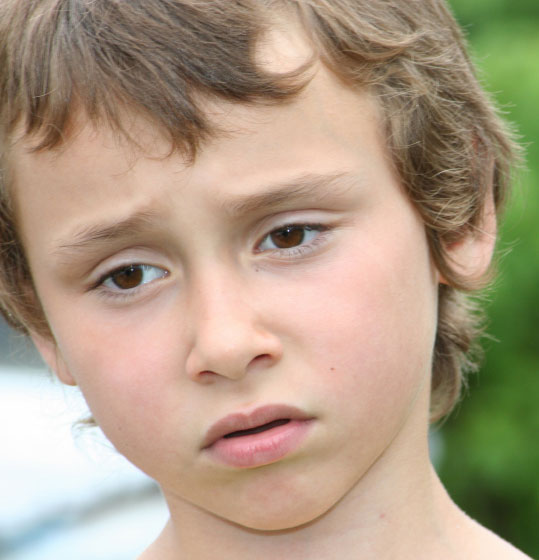
These pictures show the sad emotion. You can see this as they have a expression. Some have downcast eyes. They are not smiling and their eyes don't have much light in them. They also look as though they aren't focusing on anything in particular, it looks like they may be lost in their own thoughts. They also look as though they are a bit lonely and don't have anyone there with them, their eyes are slightly bigger and their mouths are in straight lines or frowns, instead of big smiles that children are usually showing.

Angry Emotion

The people in these photos are showing anger. You can tell that they are angry by looking at their facial expressions. They may have open mouths, like they are yelling, like the warrior and person with their hands on their head. Or they may be biting their lip or gritting their teeth, such as the other picture. They are also frowning.


I got these images from these websites:

Happy Emotion

These people are expressing the emotion, happy. You can see that they are happy because of their smiles. They are smiling and their eyes are smiling. Their eyes are very bright as well. You can also see they are happy by looking at their face as a whole, they are very bright and they are focusing on one spot or something in particular. Each of these people each smiling at something and their eyes are lit up. Their eyes are also slightly bigger and they are looking very happy.


Wednesday, February 8, 2012

Hermione Retouched - After


This is Hermione after I had retouched her. I got rid of her pimples, freckles and moles in photoshop.
I started with the healing brush and got rid of all the pimples on her face and then duplicated the layer.
I then got rid of all the smaller blemishes, such as the smaller freckles and uneven patches of skin. I also used the cloning stamp to get rid of the bags and shadows around her eyes, I used the cloning stamp with a low flow so that the eyelashes would stay.
I also used the healing brush to touch up her eyebrows and the hair around her lips. I also used the healing brush to get rid of the hair that was covering part of her face.
This activity was a lot of fun, because I love Harry Potter and I got to learn how to use some new tools! I had a lot of fun in this lesson!!

Hermione Retouched - Before


This is Hermione before I retouched her in photoshop. She had a lot of blemishes on her face such as, pimples, freckles and moles.

My Blended Animals - Polar Bear and Badger

This task was a really good learning experience and it refreshed my memory with the tools we used for the Frog/Emu.
I had a hard time picking what animals I was going to do, but once I decided I was very happy with my choice!
First off, I cut out the badger head out with the selection tools and copy and paste.
I then had to flip the badger head around as it was facing the wrong way.
After I had done this, I changed the opacity of the head so I could line it up with the polar bear. I then put a mask on the layer and rubbed out the bits I didn't need.
I then went to the Hue and Saturation so I could change the colour of the Badger head to blend into the polar bear a bit better.
I believe that this turned out really well and I'm proud of it!

My Face with Tiger Skin

This is my face with tiger skin on it! This was a really fun project to complete!
First of all I went on google and found some tiger skin that I could put over my face.
Once I'd found the skin, I opened it and my face in photoshop. I then cut out part of the tiger skin using the selection tools and copied and pasted it onto my face.
I then duplicated the layer and added a mask. Once the mask was added I used the brush tool and got rid of the parts of the skin that I didn't need.
Once I had done this, I cut out my mouth and eyes. Once I was happy with this, I began to play around with the blending modes until I decided that "Soft Light" looked the best and blended well.
This piece was really fun to do and I learnt how to use a lot of new tools!!

Tree Frog with Emu Head

A few lessons ago we completed the Tree Frog and Emu tutorial. It was a lot of fun and I learnt a lot of new tools!
First of all I had to get the images off Blackboard and open them in photoshop. I then used the selection tools to select the emu head, after I had done this, I copied and pasted it into the frog picture.
I then turned the opacity of the emu head down so that I could see the frog head as well and I was able to arrange the emu head so it was aligned with the frog head.
I then duplicated my layer and continued on. I put a mask on the new layer and began to rub out the excess emu that was not needed. I changed the brush size a lot and used the zoom tool to get the finer bits off as well.
After this was completed, I then duplicated the layer again, and began to change the colour of the Emu head so it suited the frog more.
I used the Hue and Saturation to do this. I played around a bit with it until I was happy with the colour.
I believe that my Frog/emu turned out well and I am very happy with it. Though if I were to do it again, I am sure that I could do better.

Saturday, February 4, 2012

Photoshop

In class so far, we have learnt a variety of tools in photoshop. This includes the selection tools, zoom tool, brush tool, healing tool, dodge tool, burn tool and more. We have created a frog crossed with an emu, and I think mine turned out well. We are currently in the process of putting a different skin on ourselves. We are also learning a lot more tools. Creative media is really fun so far!!

About Myself

I'm Charli and I love reading, sport and listening to music. I love Harry Potter, Starkid, Dr Who, Sherlock, Taylor Swift, Merlin and Glee.
Creative media is one of my favourite subjects, along with Japanese, Design and PE.
I love creative media and I hope it is very fun this year! I'm really excited to get started and have a lot of fun!! (: